Onboard a volunteer
This guide walks you through bringing a volunteer — a signed-in team member who works your activities and records each person’s survey responses at the door or on the phone (see User roles) — into CampaignCTRL, then getting them ready to start.
There are two ways to add a volunteer, and you can use whichever fits the moment:
- Let them sign themselves up with a QR form attached to an activity — great for recruiting at events, doors, or rallies.
- Invite them by email — best when you already know who’s joining.
Either way, the volunteer ends up in your Volunteers roster. From there they can open the activities you assign them and start recording survey responses for every person they reach — the heart of what a volunteer does. You can optionally also assign them to an Organiser, which puts them on a supervised team whose leads get reviewed.
The one thing that confuses new users: a QR signup doesn’t go live the moment a volunteer fills in the form. Each new signup waits for you to approve it on the activity’s Manage Access tab — until then the volunteer can’t sign in.
Who can do this
| Action | Who can do it |
|---|---|
| Generate a QR signup form for an activity | Owners and Admins, plus the person who created that activity |
| Approve a pending volunteer signup | The same people who can manage that activity |
| Invite a volunteer by email | Owners and Admins |
| Assign a volunteer to an Organiser (optional) | Owners and Admins |
Volunteers, Captains, and Recruiters can’t onboard other volunteers. (New to these roles? See User roles.)
Before you start
- For the QR route, you need a Call or Field activity. The QR signup form is attached to a single activity, and the option only appears on Call (phone bank) and Field (door-knocking) activities. If you don’t have one yet, create it first under Activities, then come back.
- (Optional) For the Organiser step, you need at least one Organiser. Assigning an Organiser isn’t required to onboard a volunteer or have them work activities. If you do want to use it, an Organiser leads a team of volunteers and reviews their work, so make sure someone on your team already has the Organiser role first.
Part A — Let volunteers sign themselves up with a QR form
1. Open the activity and get its signup form
Open the Call or Field activity you want volunteers to sign up for. In the top-right corner, click the … menu and choose Get QR Signup Form.
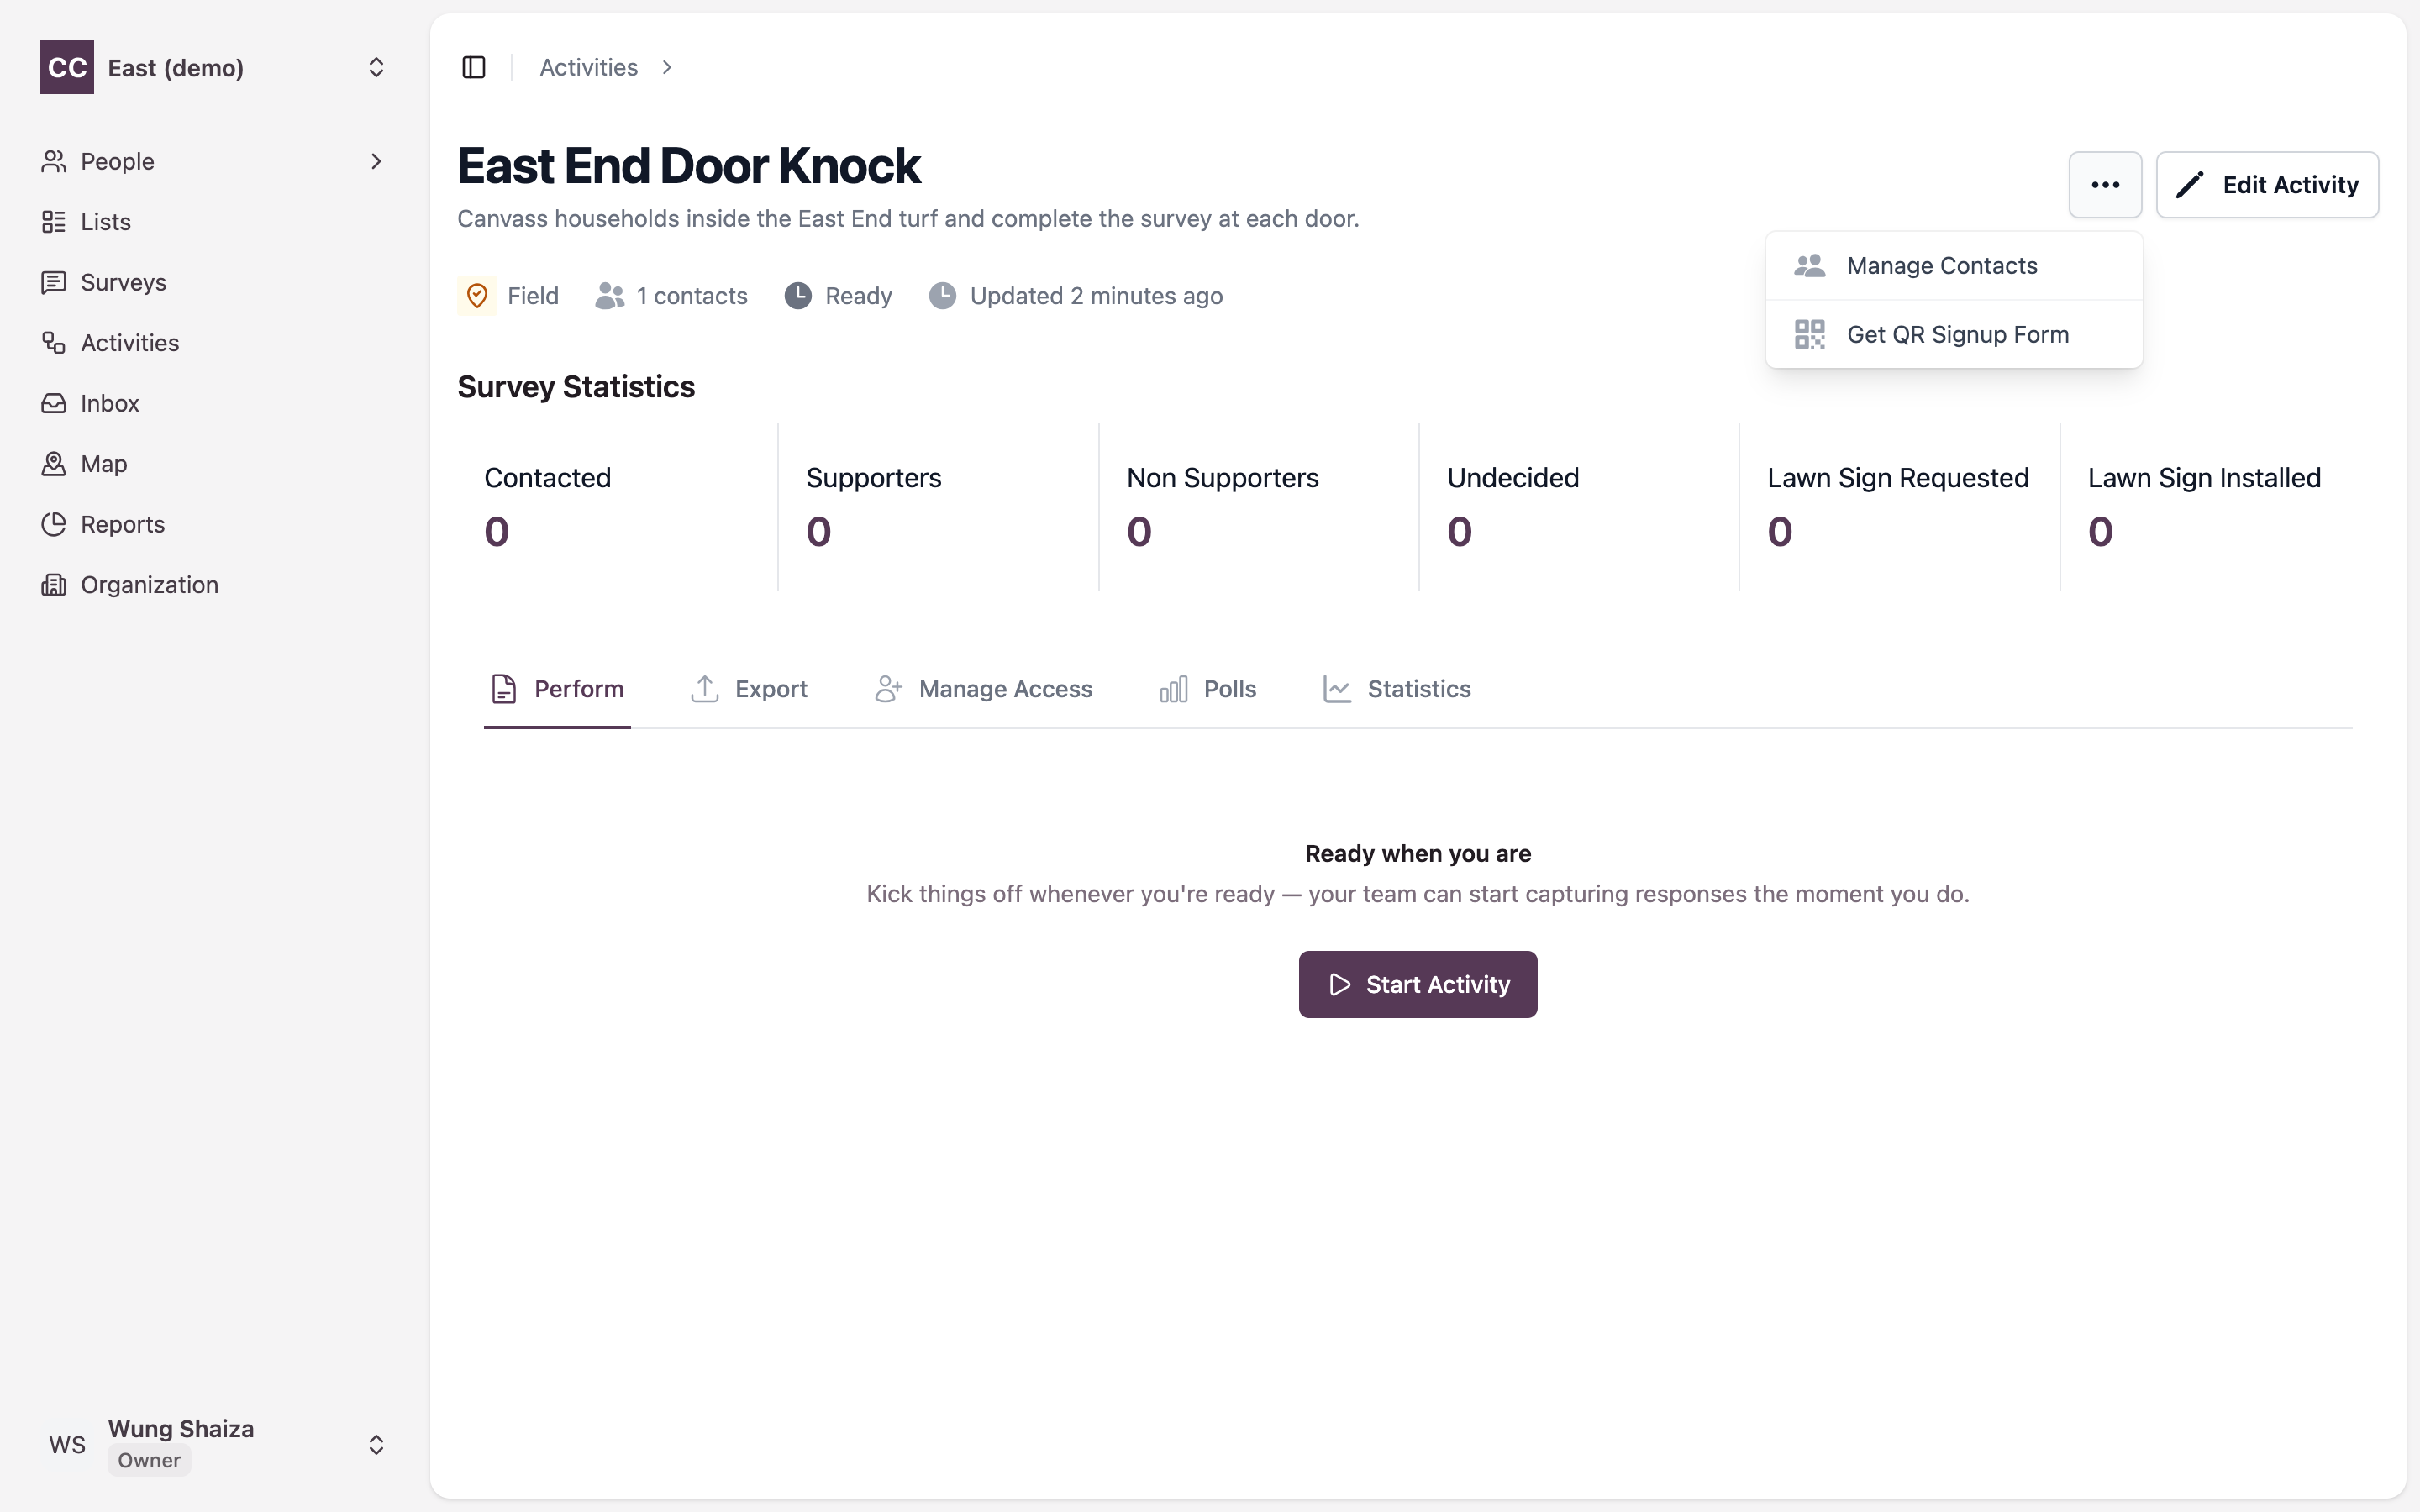
The form opens in a new browser tab, ready to print, download, or share. Put it on a flyer, a tablet at a table, or a screen at your event — anyone who opens it lands on the volunteer signup page for this activity.
Get QR Signup Form appears only on Call and Field activities, and only for people who can manage the activity. If you don’t see it, check the activity type and your access.
2. What the volunteer sees
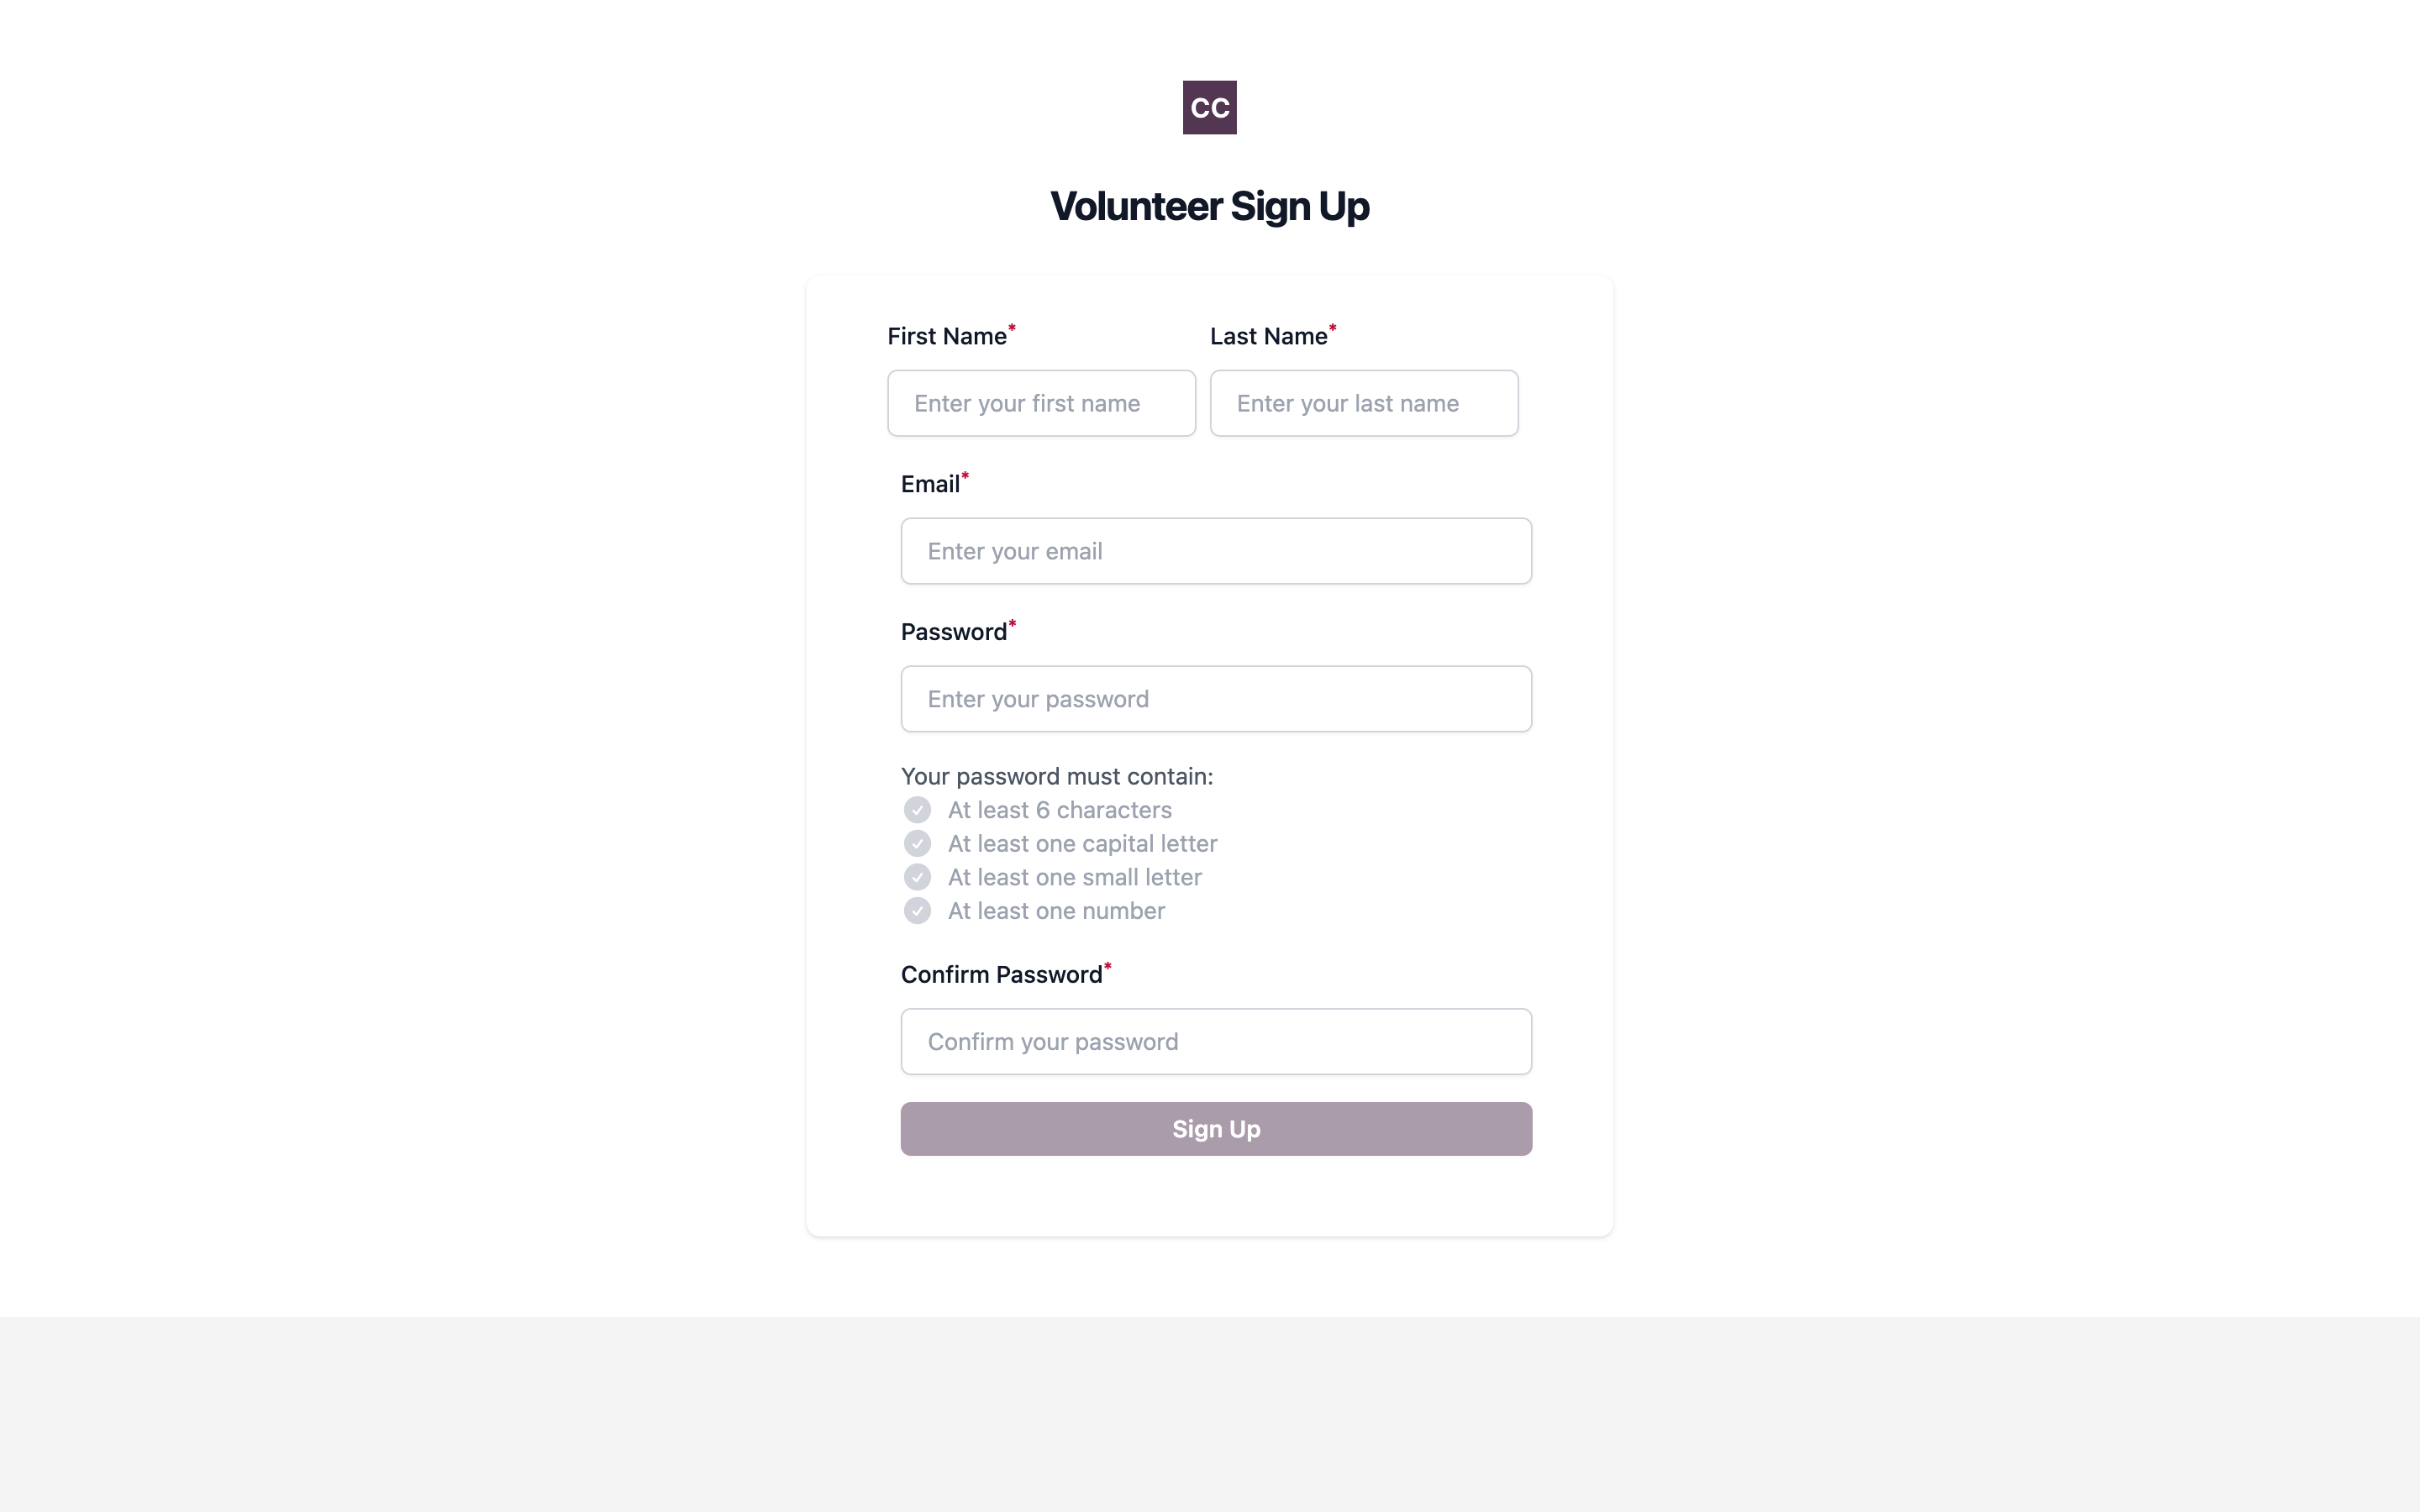
When someone opens the form, they reach a Volunteer Sign Up page. They fill in:
- First Name and Last Name
- Password and Confirm Password
After they click Sign Up, they see a confirmation that their account is awaiting approval.
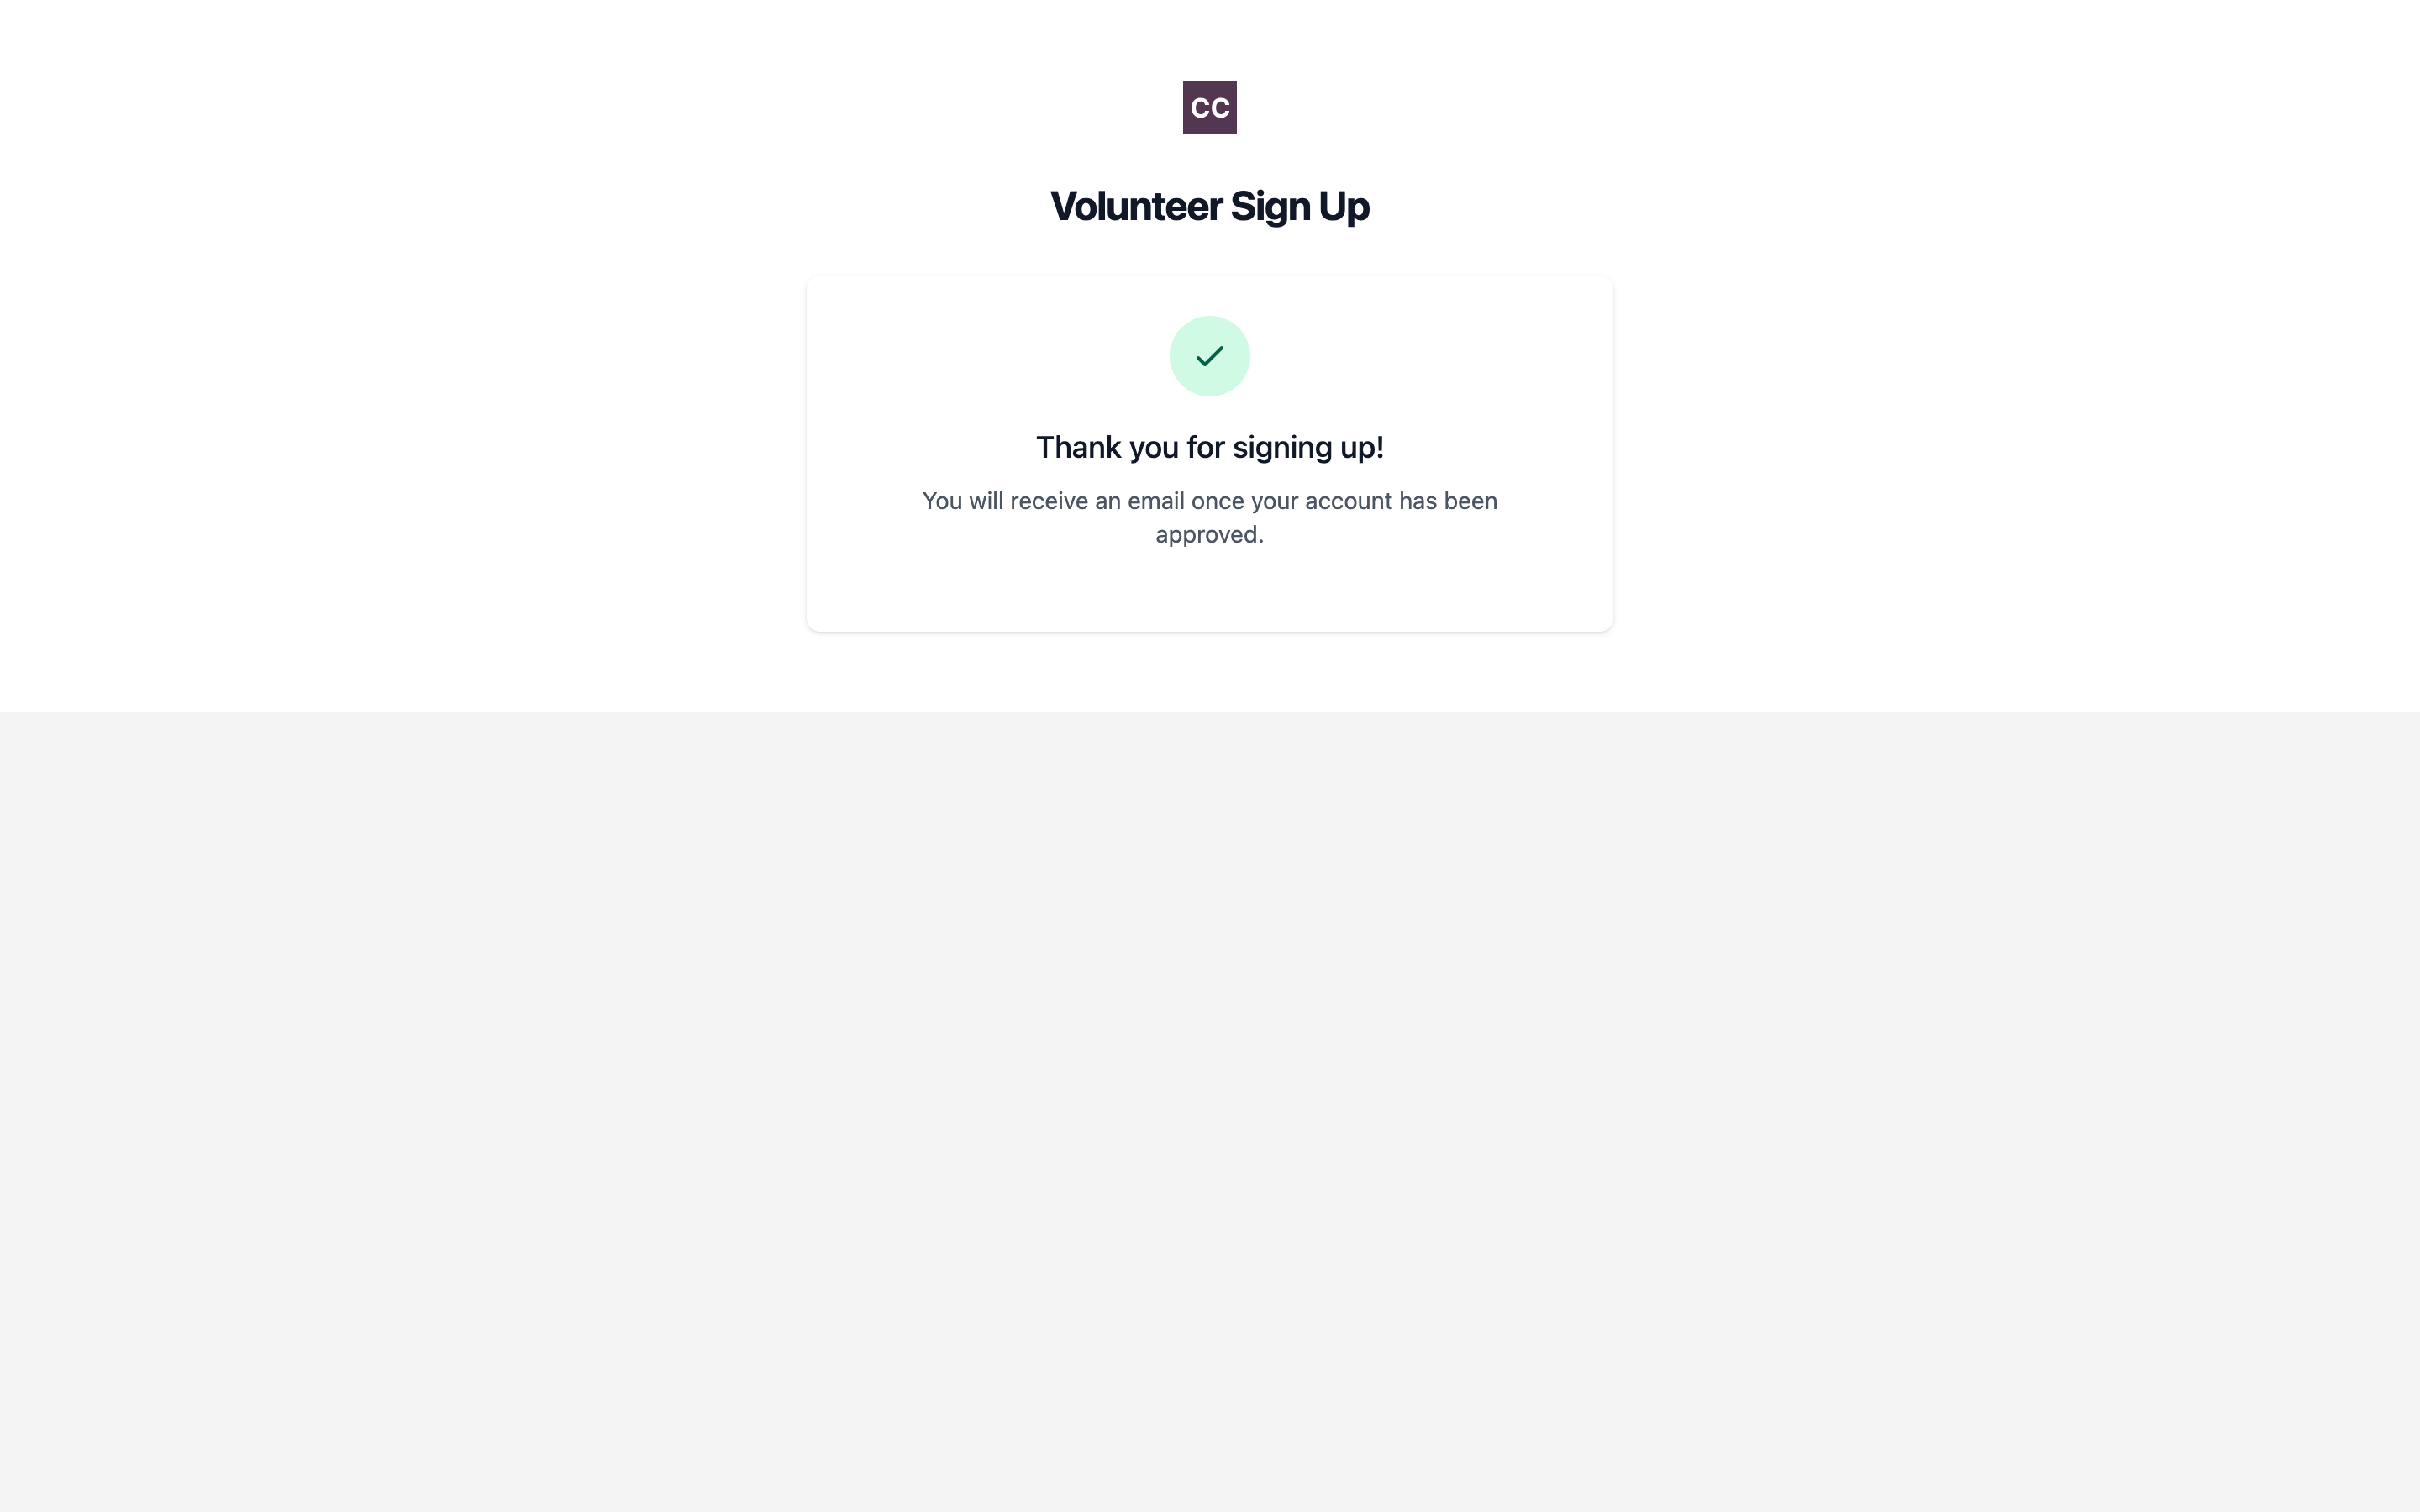
This is the important part: the volunteer is now waiting for your approval — they can’t sign in until you approve them in the next step.
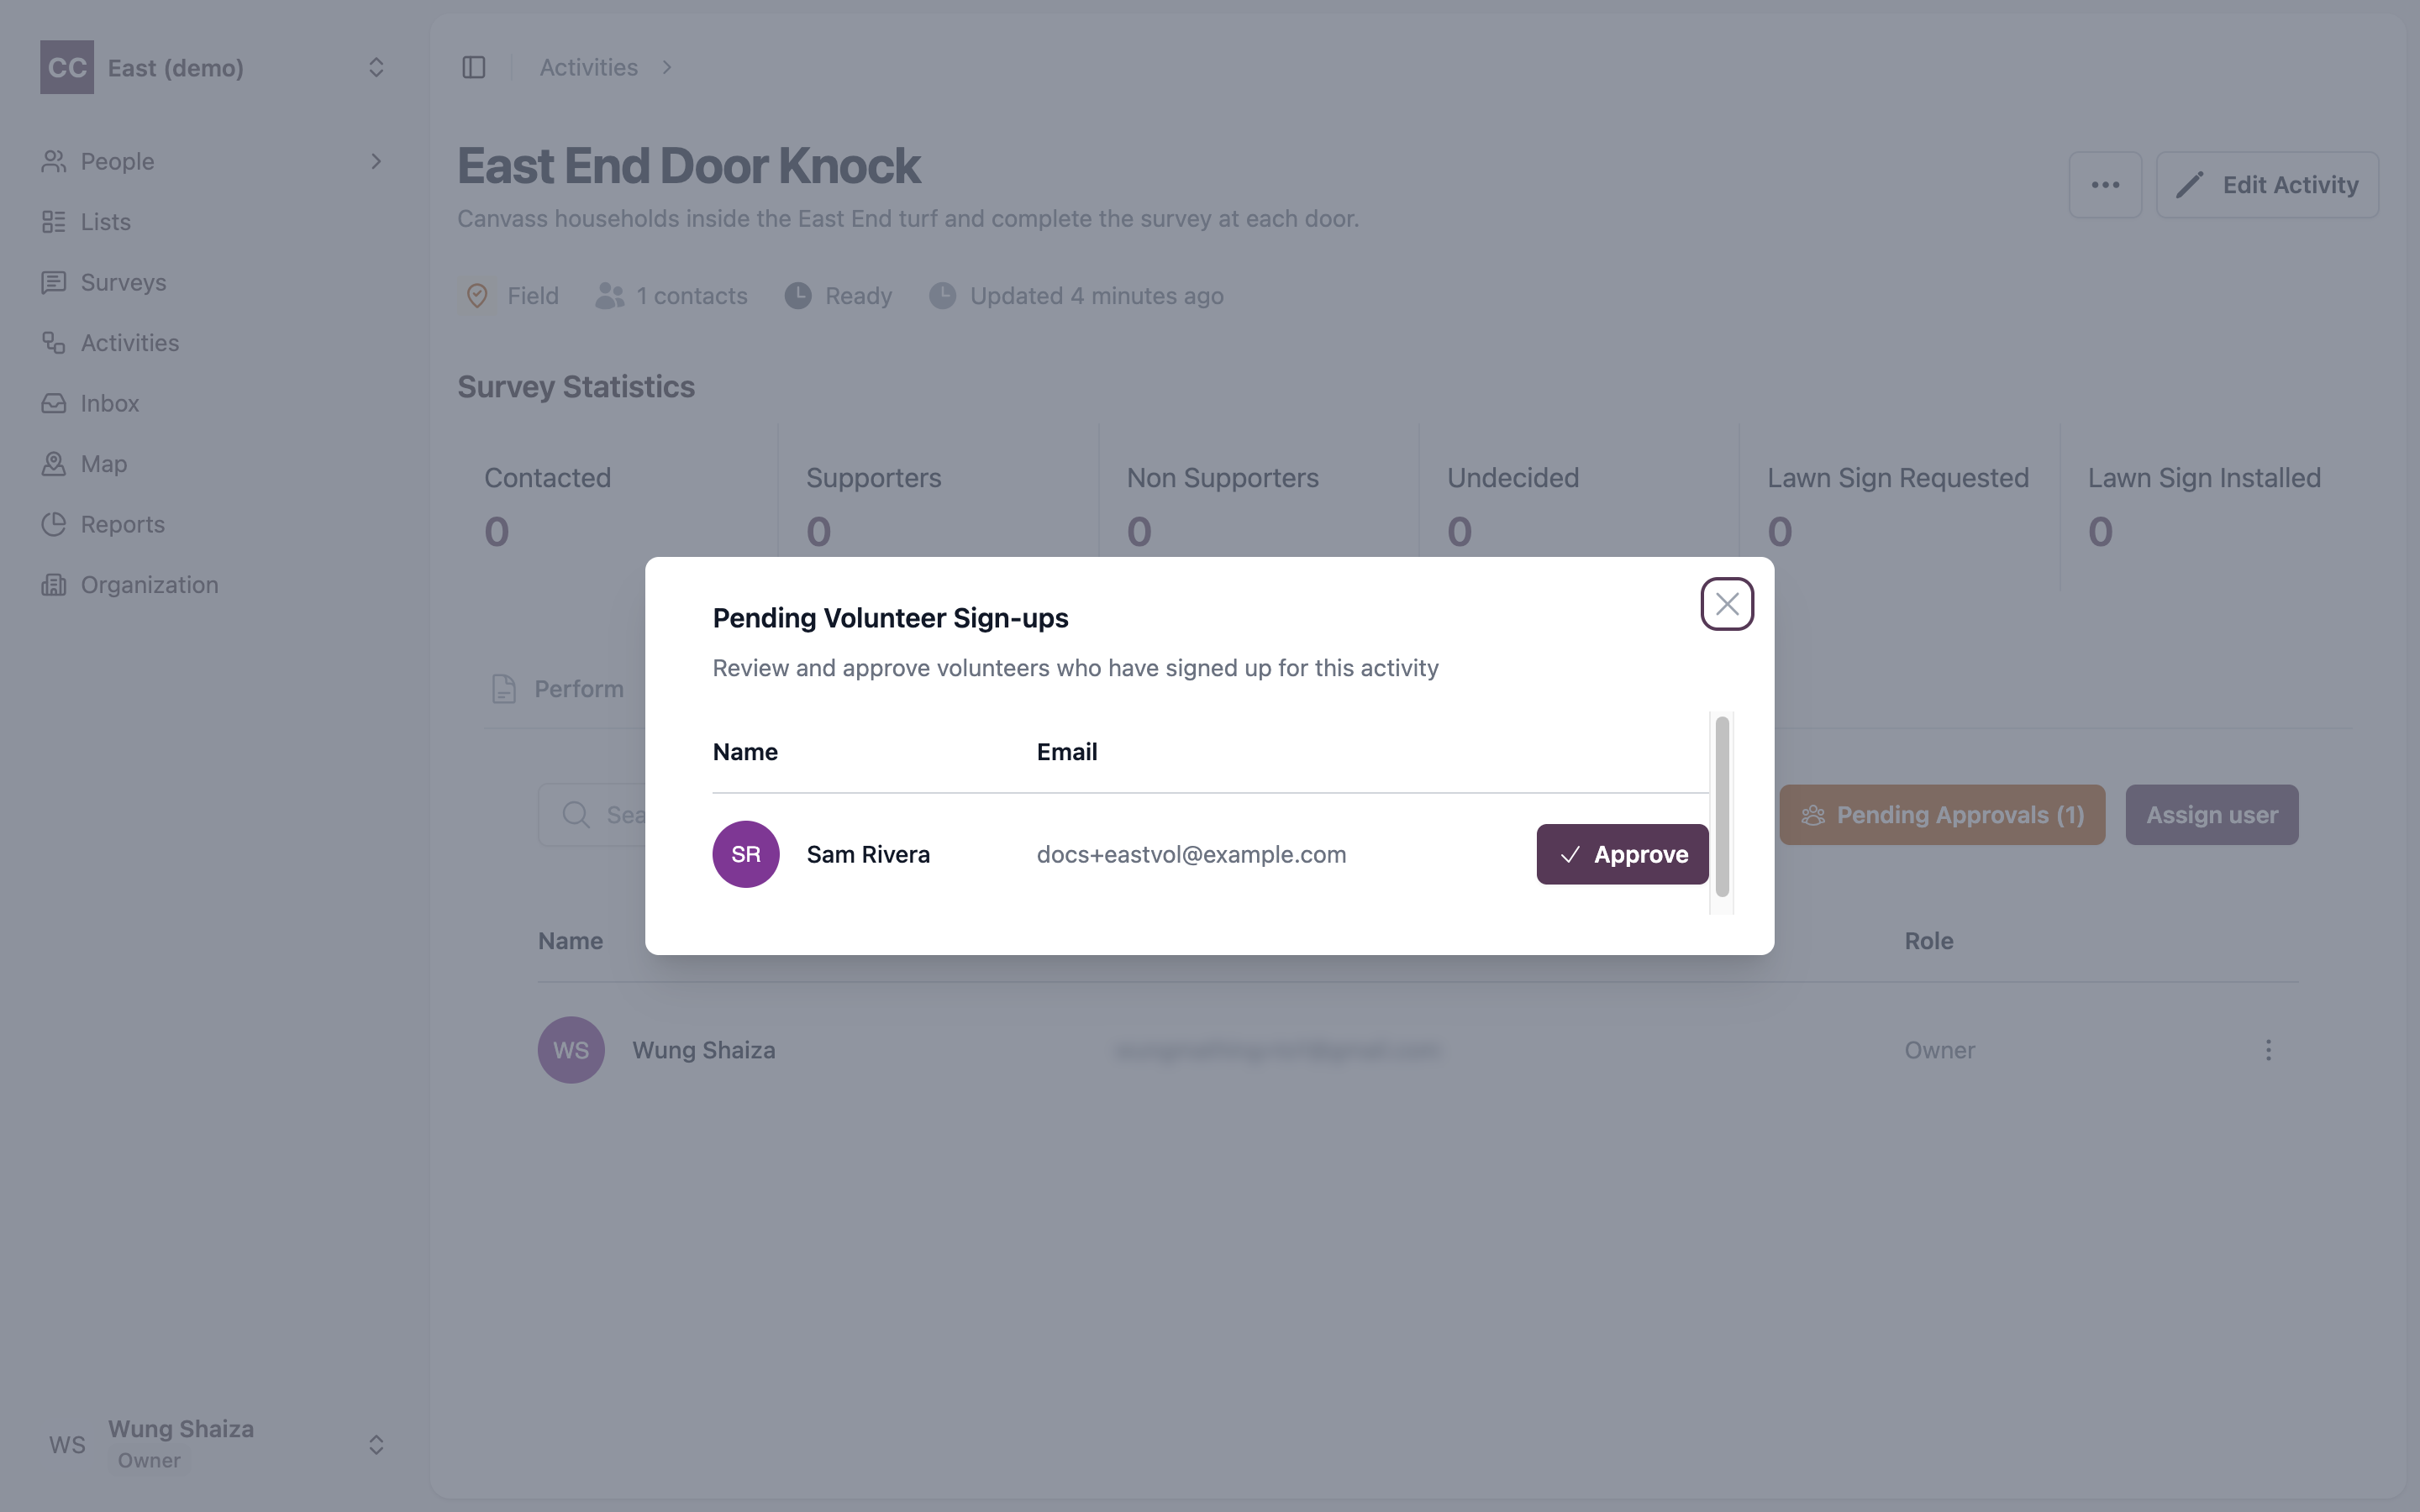
3. Approve the signup
Back in the activity, open the Manage Access tab. When signups are waiting, a Pending Approvals button shows the count. Click it to open the Pending Volunteer Sign-ups list, review who signed up, and click Approve.
Once approved, the volunteer can sign in and start working this activity — recording survey responses at each door or call. They also appear in your Volunteers roster, where you can optionally assign them an Organiser (Part C).
Part B — Invite a volunteer by email
If you already know who’s joining, invite them directly.
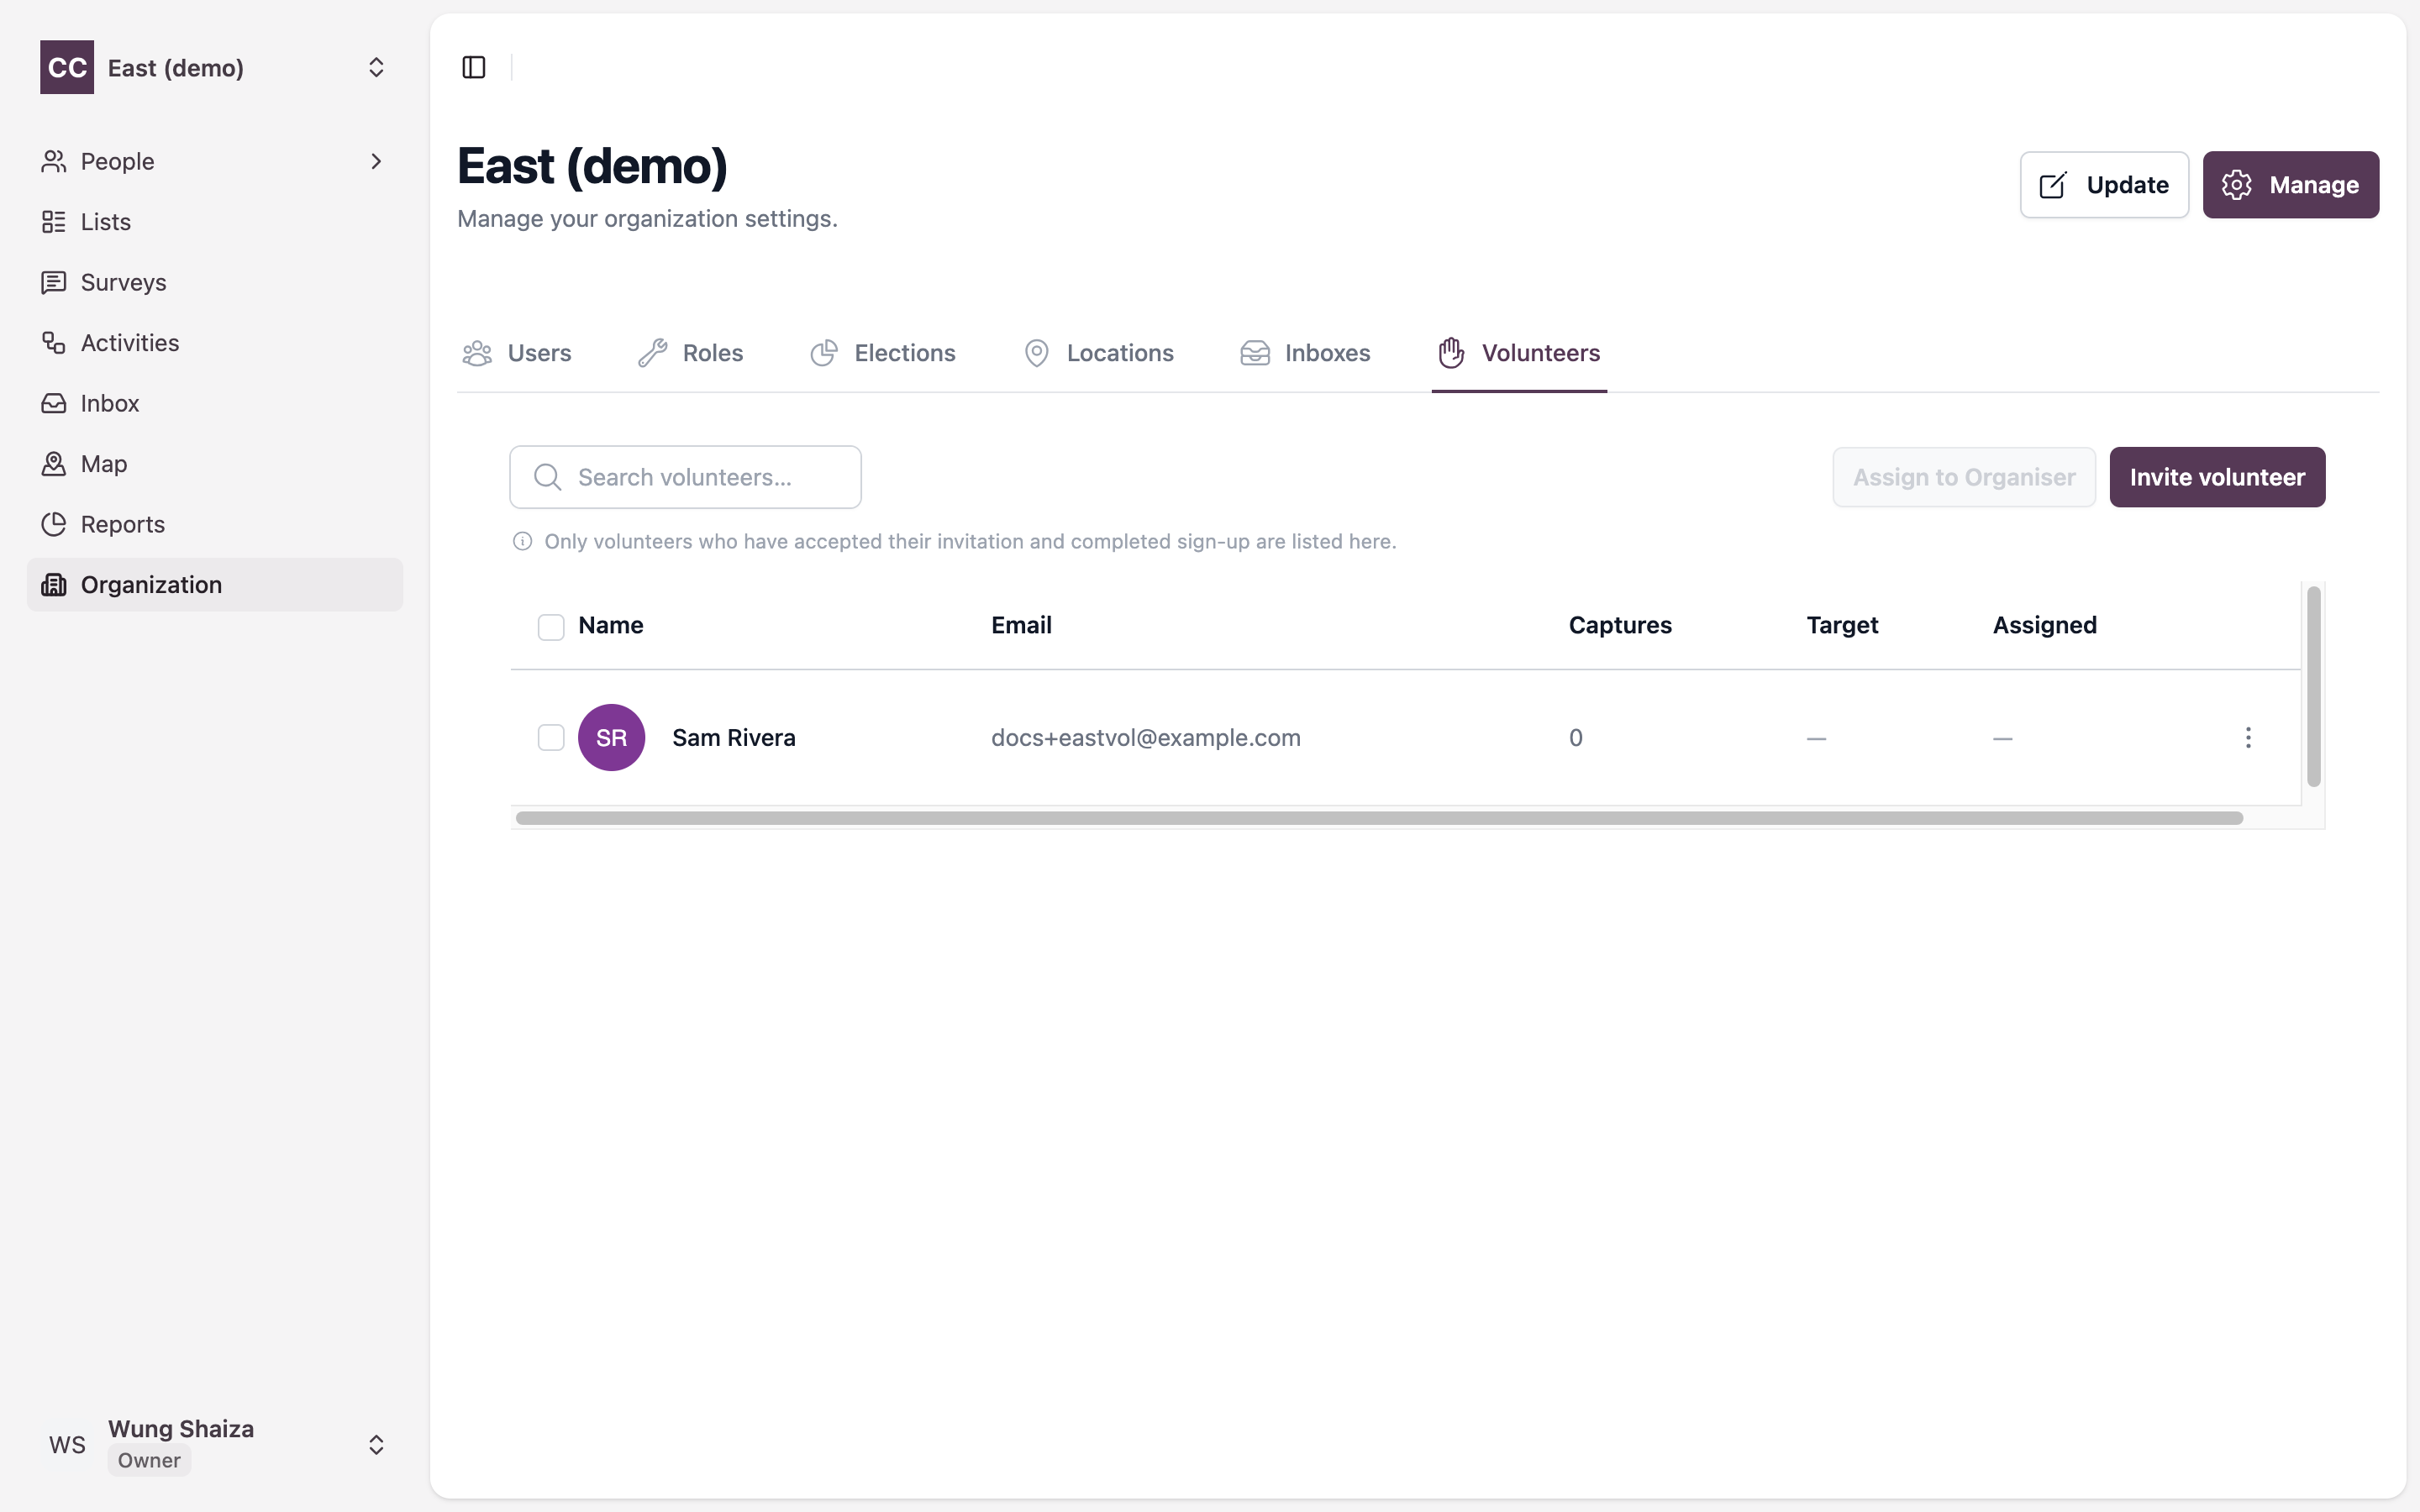
4. Open the Volunteers roster
In the left sidebar go to Organization, then the Volunteers tab. Click Invite volunteer in the top right.
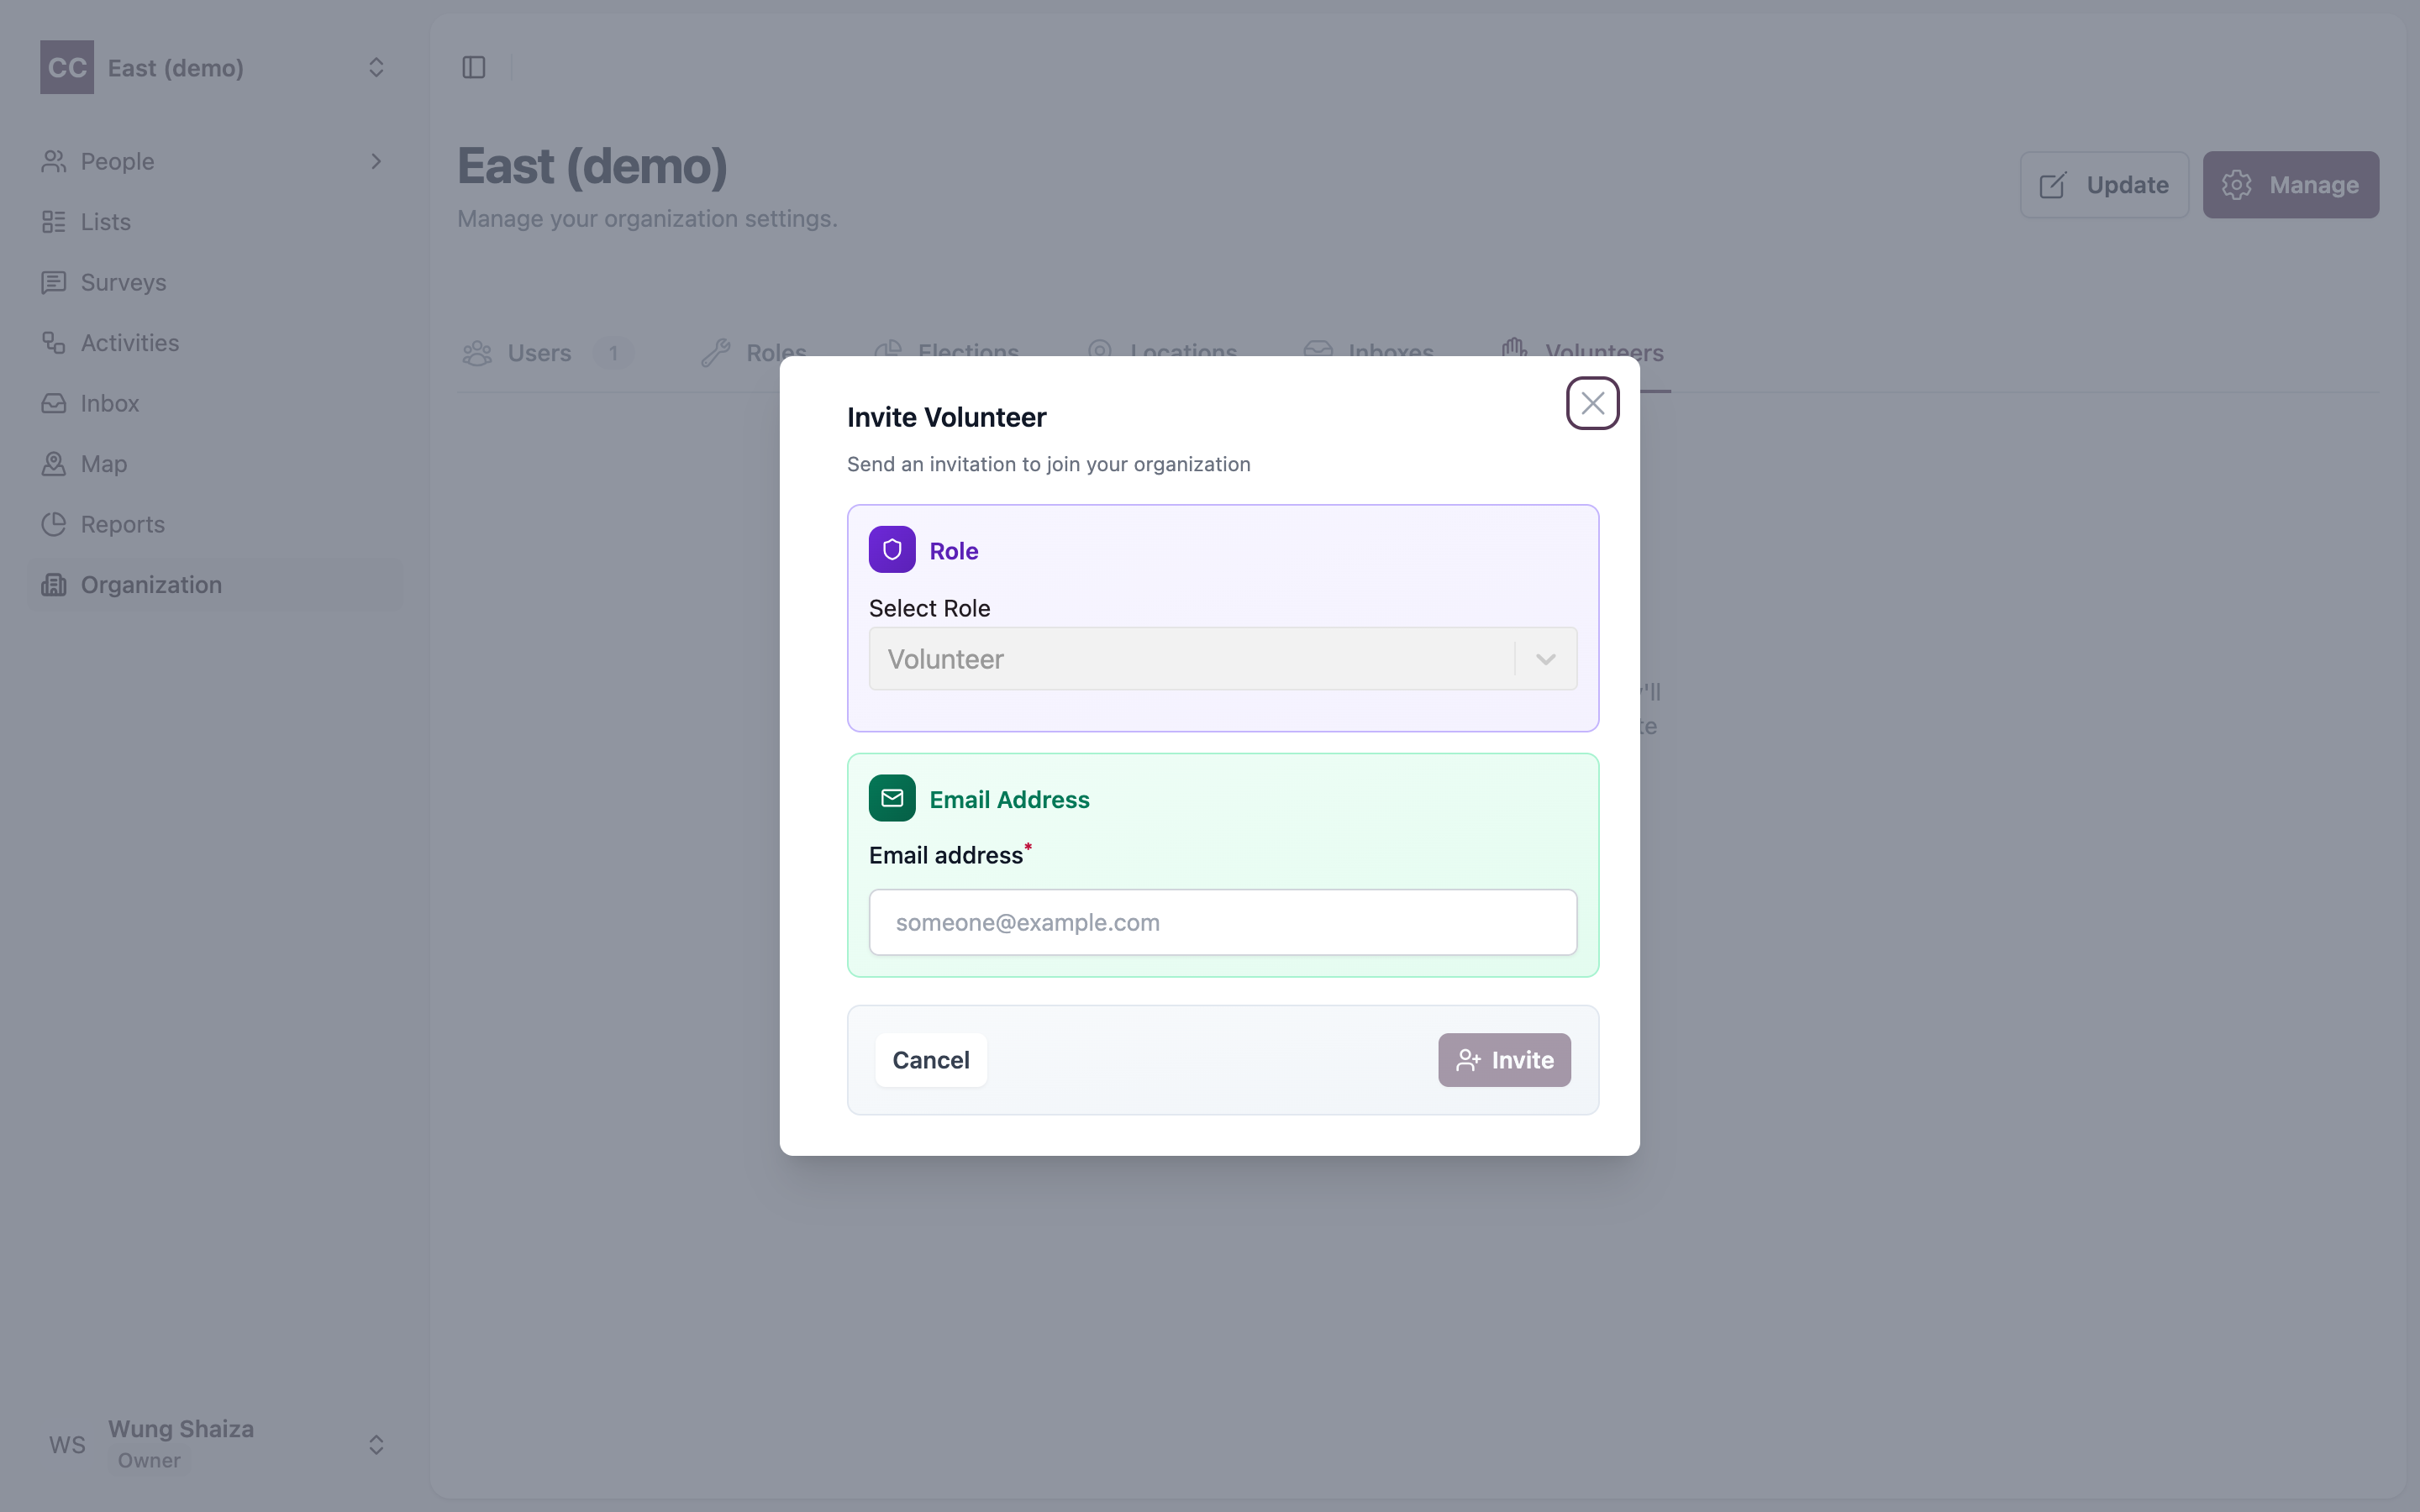
5. Fill in the invitation
The Invite Volunteer dialog opens. Choose a Role and enter the volunteer’s Email Address, then click Invite.
The volunteer gets an email, accepts the invitation, and completes their own sign-up.
They only appear in the Volunteers roster once they accept and complete sign-up — so a freshly sent invite won’t show in the list right away.
Part C — (Optional) Assign the volunteer to an Organiser
This step is optional — a volunteer can work activities and record survey responses without one. Assigning an Organiser puts the volunteer on a supervised team, so the leads they capture get reviewed. Skip it if your campaign doesn’t use Organisers.
6. Pick the volunteers and assign
On the Volunteers page, tick one or more volunteers, then click Assign to Organiser (the button shows how many you’ve selected). You can also use the action menu on a single volunteer’s row.
In the Assign Organiser dialog, search for the Organiser by name or email, select them, and click Save.
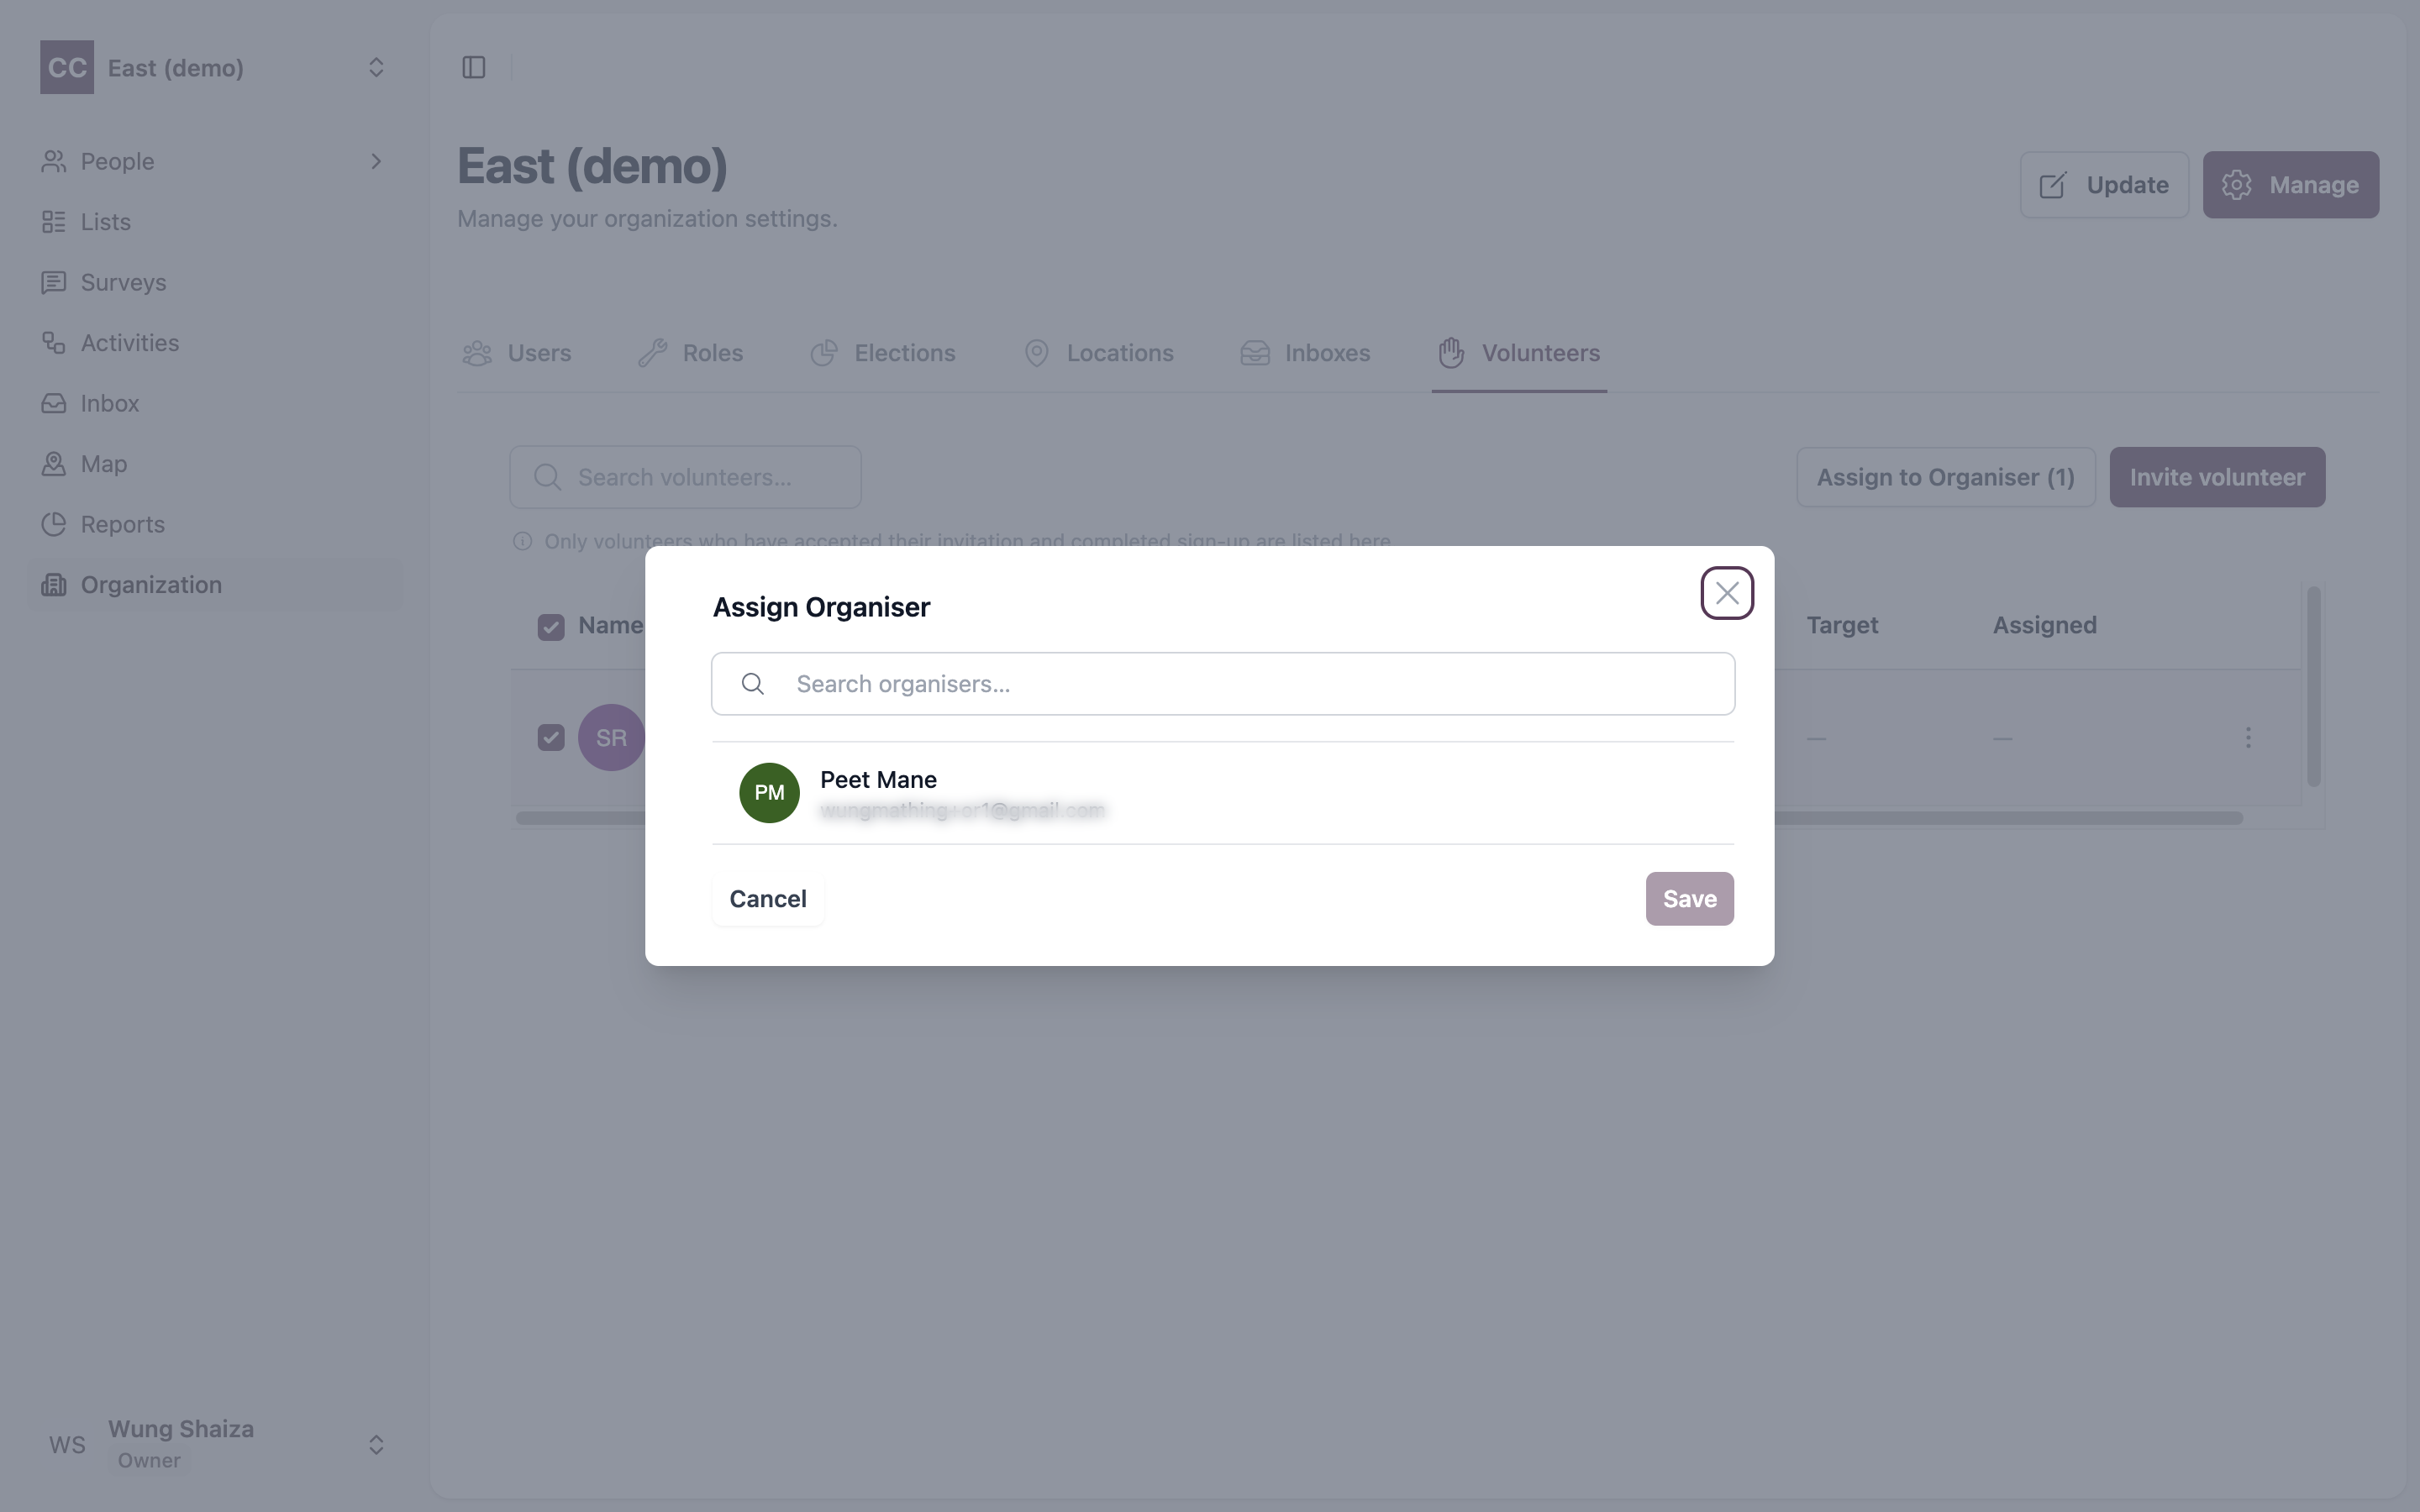
Each volunteer has one Organiser at a time. From the same row menu you can also set a lead target — the number of leads you’d like that volunteer to bring in.
7. Done
Your volunteer is in and ready to work the activities you assign them — recording each person’s survey responses at the door or on the phone, which is the heart of the role.
Organiser, Captain, Recruiter — what’s the difference? An Organiser signs in and supervises a team of volunteers. A Captain and a Recruiter are field agents who never sign in — they work from a private text link instead. They’re a separate kind of helper, set up elsewhere. See User roles for the full picture.